The following guide is suitable for this beacon only (BC-U1) with MAC address starting with DD33 or DD34. The MAC number is printed on the label on the beacon; sorry, but it’s really small due to the small size of the beacon and label! If your beacon has a MAC address starting with DD88, please visit this link instead:

Note: If you have any questions about any of the following instructions, please feel free to CONTACT us any time. We are here to answer your questions or help in any way. Almost all emails are answered by senior support staff within hours. If you don’t receive an answer, check your spam folder.
99% of the problems that beginners have with beacons are just a simple misunderstanding of one of the concepts. Admittedly, the world of beacons is a bit confusing with all of the TX, interval, broadcast, UUID…technical words. Especially since most people don’t understand that BLE (Bluetooth Low Energy) is actually something different than regular Bluetooth. In other words, don’t feel bad at all if you are a little confused at first. I tried to make it as clear as possible in the instructions below, but that requires lots of words, which sometimes can be a bit boring to read when you are excited about a new beacon you just received in the mail!
Another note: Before we do anything, it should be noted that you can use your beacon straight out of the box just by turning it on (see “turn the beacon on” menu choice below). There is no absolute requirement to change the configuration settings. This is very good advice for HomeAssistant users too. For your first beacon setup, just turn the beacon on. That’s it. Don’t try to adjust any settings until you have HA or the ESP working properly. If it’s not working, make adjustments on the HA or ESP first to try to solve the problem. The beacon is very rarely the source of the problem.
That said, there are several situations in which you might want to change the settings, so if that is the case, please continue reading.
Shortcut links to jump directly to various sections on this page
Default Settings for the BC-U1
Instructions for Configuring the BC-U1
Get the free configuration app
Turn the beacon on
Condensed Instructions
Detailed Step-by Step Instructions
Beacon Name
Advertising Interval
Advertising Flags
TX Power
Measured Power
Beacon Type
Battery Power Percent
iBeacon UUID
iBeacon Major
iBeacon Minor
TLM Interval
Eddystone TLM
Eddystone URL
Eddystone UID
Multiple Broadcasts
Modify Password
Trigger Command
Turn the beacon off
Default Settings for the BC-U1
Here are the default settings that the beacon has pre-configured into it before we ship it out to you.
System Info (this field is not changeable by the user)
System ID is the unique MAC address of each beacon
Model is the model number BC-U1 (the sample image further down this page shows BC011 which is another beacon, but yours will show as BCU1).
Version is the firmware version
Beacon Name
Default: BlueCharm_(random number)
-Can be changed by the user to any name of 16 or less ASCII characters
Advertising Interval
Default: 100
Changeable: Any number ranging from 100-10000 milliseconds. 1000 milliseconds equals 1 second.
Advertising Flags
Default: Connectable
Changeable:
-Uncheck “connectable” to make beacon unconnectable.
-“Power Always On” is not applicable with this beacon since it is USB powered not battery powered.
TX Power
Default: 0 dBm
Changeable: 4dBm, 0dBm, -4dBm, -8dBm, -12dBm, -16dBm, -2dBm, -40dBm. 4dBm is the strongest, -40dBm is the weakest.
Measured Power (Calibrated RSSI when beacon is 1 meter away from scanner)
Default: -59 (automatically changes when the TX level is adjusted)
Changeable: Advanced users only. We recommend that you do NOT make any adjustments to this number.
Beacon Type
Default: iBeacon broadcast
Changeable: Any or all of iBeacon, URL, UID, and/or TLM. (KSensor mode is only active for beacons with a telemetry chip, which the BC-U1 does not have. Another beacon, the BC021, optionally includes a telemetry chip and can be custom ordered in minimum quantities of 1000 beacons. Contact us for more info).
URL Address
Default: https://www.bluecharmbeacons.com
Changeable: any URL but must be 17 “countable characters” or less.
Some URL length rules and examples:
https:// counts as 1 character only.
https://www. counts as 1 character only.
Standard domain name extensions such as .com/ count as 1 character only but .com counts as 4 characters since is it missing the standard trailing slash; just add the trailing slash.
.net/ counts as 1 character only.
.bu/ counts as 4 characters since .bu is not a standard internet domain name extension.
Example: https://www.cnn.com/ is counted as 5 characters only.
Suggestion: If you want to configure a very very long URL with more than 17 countable characters, just use a free URL shortener such as bitly.com to create a shortcut URL for your long URL. For example, you could configure “https://bit.ly/3fiVEj8” into the beacon to take users to “https://bluecharmbeacons.com/BC011-ibeacon-multibeacon-quick-start-guide/”.
UID NamespaceID
Default: 0x626C7565636861726D31
Changeable: any 10 byte Eddystone UID namespace ID
UID InstanceID
Default: 0x000000000001
Changeable: any 6 byte Eddystone UID namespace ID
iBeacon UUID
Default: 426C7565-4368-6172-6D42-6561636F6E73
Changeable: Any proper length and formatted UUID where the each digit is hex. i.e. has a Value of 0 to 9 or A to F. Note that with this app, you need to enter dashes in the correct spots.
iBeacon Major ID
Default: 3838
Changeable: Any number from 0-65535, e.g. 58 or 229 or 5791 or 59,985
iBeacon Minor ID
Default: 4949
Changeable: Any number from 0-65535, e.g. 58 or 229 or 5791 or 59,985.
TLM Interval
Default: 10
Changeable: Any number from 2-100, e.g. 10 or 18 or 27 or 100.
Trigger Command
Default: not applicable with this beacon since it does not have a button.
Changeable: NA
Modify Password
Default: 0000000000000000
Changeable: any password ranging from 8-16 ASCII characters
NOTE 1: It is NOT recommended for users to change the password. If you do change the password and forget what you changed it to, there is nothing we can do to help you. The beacon can NOT be reset to factory settings in order to get back to the default password. We don’t have any sort of secret backdoor password to get back into the beacon; that would be fake security, right? So if you try to change this default password, be sure to type very carefully and write down the new password.
NOTE 2: If you still want to change the password, please note that the password is stored in the beacon AND in the app on that particular smartphone as follows:
-When you change the password on one beacon, the app is creating and storing a little database of MAC numbers (i.e. beacons) and their respective passwords.
-When the app tries to connect to a beacon/MAC that it has never connected to before, it tries 0000000000000000 as the password.
-When the app tries to connect to a known beacon/MAC that it has connected to before, it uses the password that it has stored in its little database (assuming you have previously changed the beacon password with that smartphone; if not, it just uses the default 0000000000000000).
The behavior does not carry over from one device to another. In other words, the little database is stored inside the app on device 1 but is not shared with any other device or the cloud. (That makes good sense for security). That said, we still recommend that you do NOT change the password. If you are concerned about security, change the Advertising Flag setting to unconnectable.
INSTRUCTIONS FOR CONFIGURING THE BC-U1
Step 1: Get the free configuration app
Depending on your type of smartphone, click on one of the links below to download the free configuration app for your phone. You will use this app to change the beacon from the default settings to the settings that you may prefer. But remember, you don’t necessarily need to change the configuration. Most users can simply use the default settings. All they need to do is to turn the beacon on. (see Step 2 below)
-iPhone smartphone version: Download the “KBeacon” app from the Apple’s App Store. (Be careful not to confuse this app with two other similarly named apps called KBeaconPro and KBeaconConfig).
-Android smartphone version: Download the “KBeacon” app from the Google Play Store. (Be careful not to confuse this app with two other similarly named apps called KBeaconPro and KBeaconConfig).
Android users should be sure to give the app Location permission AND also be sure that your Android smartphone’s Location Services are enabled. You can find these settings in your phone’s Settings menu, and typically in the Location sub menu (but of course, every brand of Android can be slightly different, so dig around in Settings until you find it).
-Once you have installed the app, open the app on your phone.
Step 2: Plug the beacon into a USB 5V power source
-Turn on the beacon by plugging it into a USB 5V power source.
Step 3: Connect to the beacon with the app to change settings
Next, we have some condensed instructions for the tech savvy. If you feel more comfortable going through it step-by-step, scroll down this page further to “Detailed Step-by-Step Instructions“.
Condensed Instructions
- Use the app to connect to the beacon. (If you have previously changed the configuration of the beacon to “unconnectable”, in order to connect to it again, you need to first unplug the beacon from the power source then replug it to make it connectable. It will be connectable for 30 seconds, then revert to unconnectable. Note: if you are powering the beacon with a USB wall charger, you need to actually unplug the beacon from the wall charger, not simply unplug the wall charger from the wall outlet.)
- Connect to the beacon by tapping on its name on the app screen. (MAC address shown will match MAC address on back of beacon). If the app scan screen is blank, then be sure to turn on bluetooth on your phone. If you do that, and the app screen is still blank, hard close the app and restart it.
- On the configuration page after connecting, make changes to the parameters you wish to change. Tap SAVE after each change to temporarily save your changes and go back to the main Beacon Detail page.
- When done making all of your desired changes, tap UPLOAD on the Beacon Detail page to upload all of those changes to the beacon. If you don’t do this, all of the changes you temporarily saved on each setting will be lost after you exit the app. You should see an Upload Successful or Success message on your screen.
- Tap the Left Arrow button on the top left of the screen to return to the main app scan screen.
- Wait for changes to be scanned by your phone, or swipe down on the screen to have those changes be recognized by your phone quicker.
- If you have activated the TLM broadcast, your beacon’s TLM data (battery, temperature, and broadcast count/time data) will update every 10th broadcast.
- That’s it. You’re done! Once you configure the beacon settings, you no longer need to connect to it. Beacons operate totally independently from your phone. Please see our FAQ section for more info about beacons in general.
- If you wish to stop broadcasting, unplug the USB beacon from its power source.
Detailed Step-by Step Instructions
If you really want to learn the details about configuring your beacon (and lots of other interesting info about beacons along the way), I highly recommend you take the time to read the following Detailed Step-by-Step Instructions. It takes a bit of time, but will be well worth it and will possibly save you some major headaches later.
Now that you have turned on the beacon, go back to the KBeacon app screen on your phone.


Tap the SCAN button in the upper right hand corner to begin scanning for nearby beacons. Be sure that your phone’s Bluetooth is turned on, otherwise you will see a BLE error on the app screen. To stop the scan, tap on the STOP button in the upper right hand corner. Swipe down on the screen to refresh the scan at any time. This is useful for refreshing the data on the screen.
(Android users: If you are not seeing ANY devices on the scan screen, you should check in your phone’s settings to be sure that the KBeacon app has be given Location Permission and also that your phone’s Location Services are enabled.)
If the app scan screen is blank, then be sure to turn on bluetooth on your phone. If you do that, and the app screen is still blank, hard close the app and restart it.
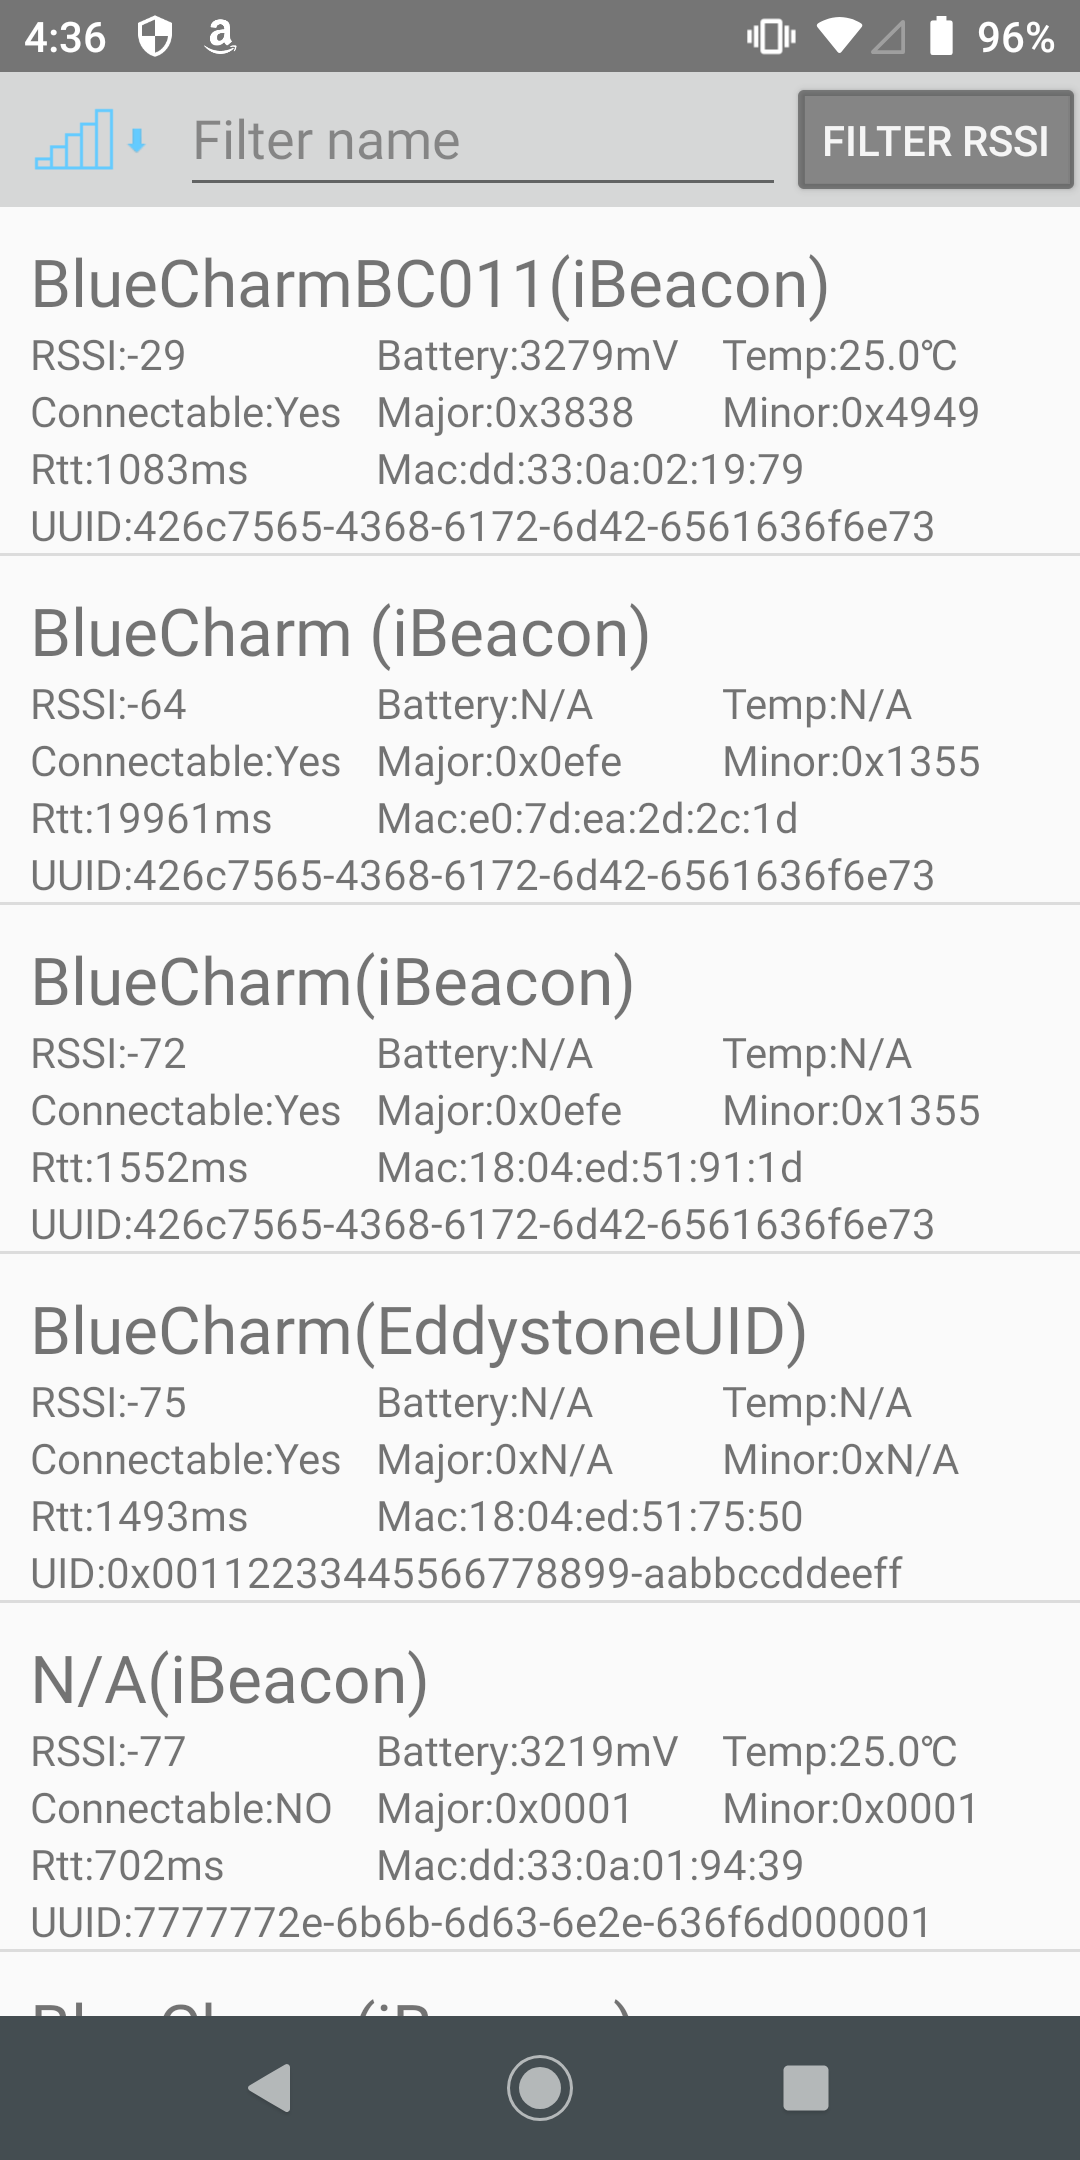
You may be surprised to see a long list of times on this scan page. Those are the various Bluetooth devices around you (things like speakers, iPods, iPads, smartphones, Bluetooth-enabled refrigerators, etc.). If you are having a hard time finding your beacon on this scan list, use the “tap to filter” selector at the top of the app screen to filter out devices with lower RSSI values (they are far away from you), then place your beacon next to your phone so that it shows on the filtered list as the closest Bluetooth item.
A quick word about RSSI figures: RSSI figures are a measure of the strength of the signal between your smartphone and the beacon. A distant beacon will show on the app screen with a “low” (weak) RSSI. Since RSSI figures are all negative numbers, a low RSSI would be -90, for example. A higher RSSI figure would be -27, for example. The further away from zero, in the negative direction, indicates that the signal is weaker, and thus we can infer that the beacon is further away from your phone.
The top beacon in the screenshot above shows the name “BlueCharm_124”. Yours will have a different number than this one, of course. If you are not sure which beacon on the list is yours, or maybe you have multiple beacons, take a look at the back of your BC-U1 to see the MAC number (a unique fixed ID number) for your beacon, then compare this number to the MAC number listed for each beacon on the scan screen above. That will help you clearly identify which one is the correct beacon that you are trying to configure.
Sharp-eyed readers might notice that the above screenshots have a difference on iPhone vs Android. iPhone’s don’t like to display the UUID for some strange reason. They can “see” it and react to it, but they don’t like to show it on an app scan screen. iPhones will gladly show the Major and Minor, so we can see those two numbers on the iPhone screenshot above (3838 and 4949). The Android screenshot, on the other hand, shows the UUID of the beacon as well as the major and minor.
In the example screenshot above, we see that the beacon named BlueCharm_124 is broadcasting an iBeacon broadcast. We see the RSSI of the beacon which indicates the strength of the signals back and forth with the beacon. (-30, for example, means the beacon is very close to the phone. -80, for example, means it is far away. Since the “Measured RSSI” of this beacon is set at -59 = 1 meter, that means if the beacon’s RSSI figure on the app scan screen is around -59, then the beacon is probably about 1 meter away from the phone. (This is only an approximation as RSSI figures fluctuate according to obstacles, movement, orientation of the beacon and/or the phone, etc. Due to its small size and small internal antenna, the BC-U1 tends to have a slightly lower RSSI. Since it is not battery powered, you can turn up the TX power to max to increase the RSSI.)
You might also notice that the iPhone version of the app does not show the UUID of the beacon, but the Android version does (see image above; the default UUID is 426C7565-4368-6172-6D42-6561636F6E73). This is a quirk of the iPhone and Apple policy; they don’t want users to see the UUID of various BLE things. Don’t worry though, this will not effect the performance of your beacon.
In the example screenshot, we can also see that the “battery power” percentage is 100%. Your BC-U1 USB beacon does not have a battery, and is powered from a USB source, so your “battery power” will always read as 100%.
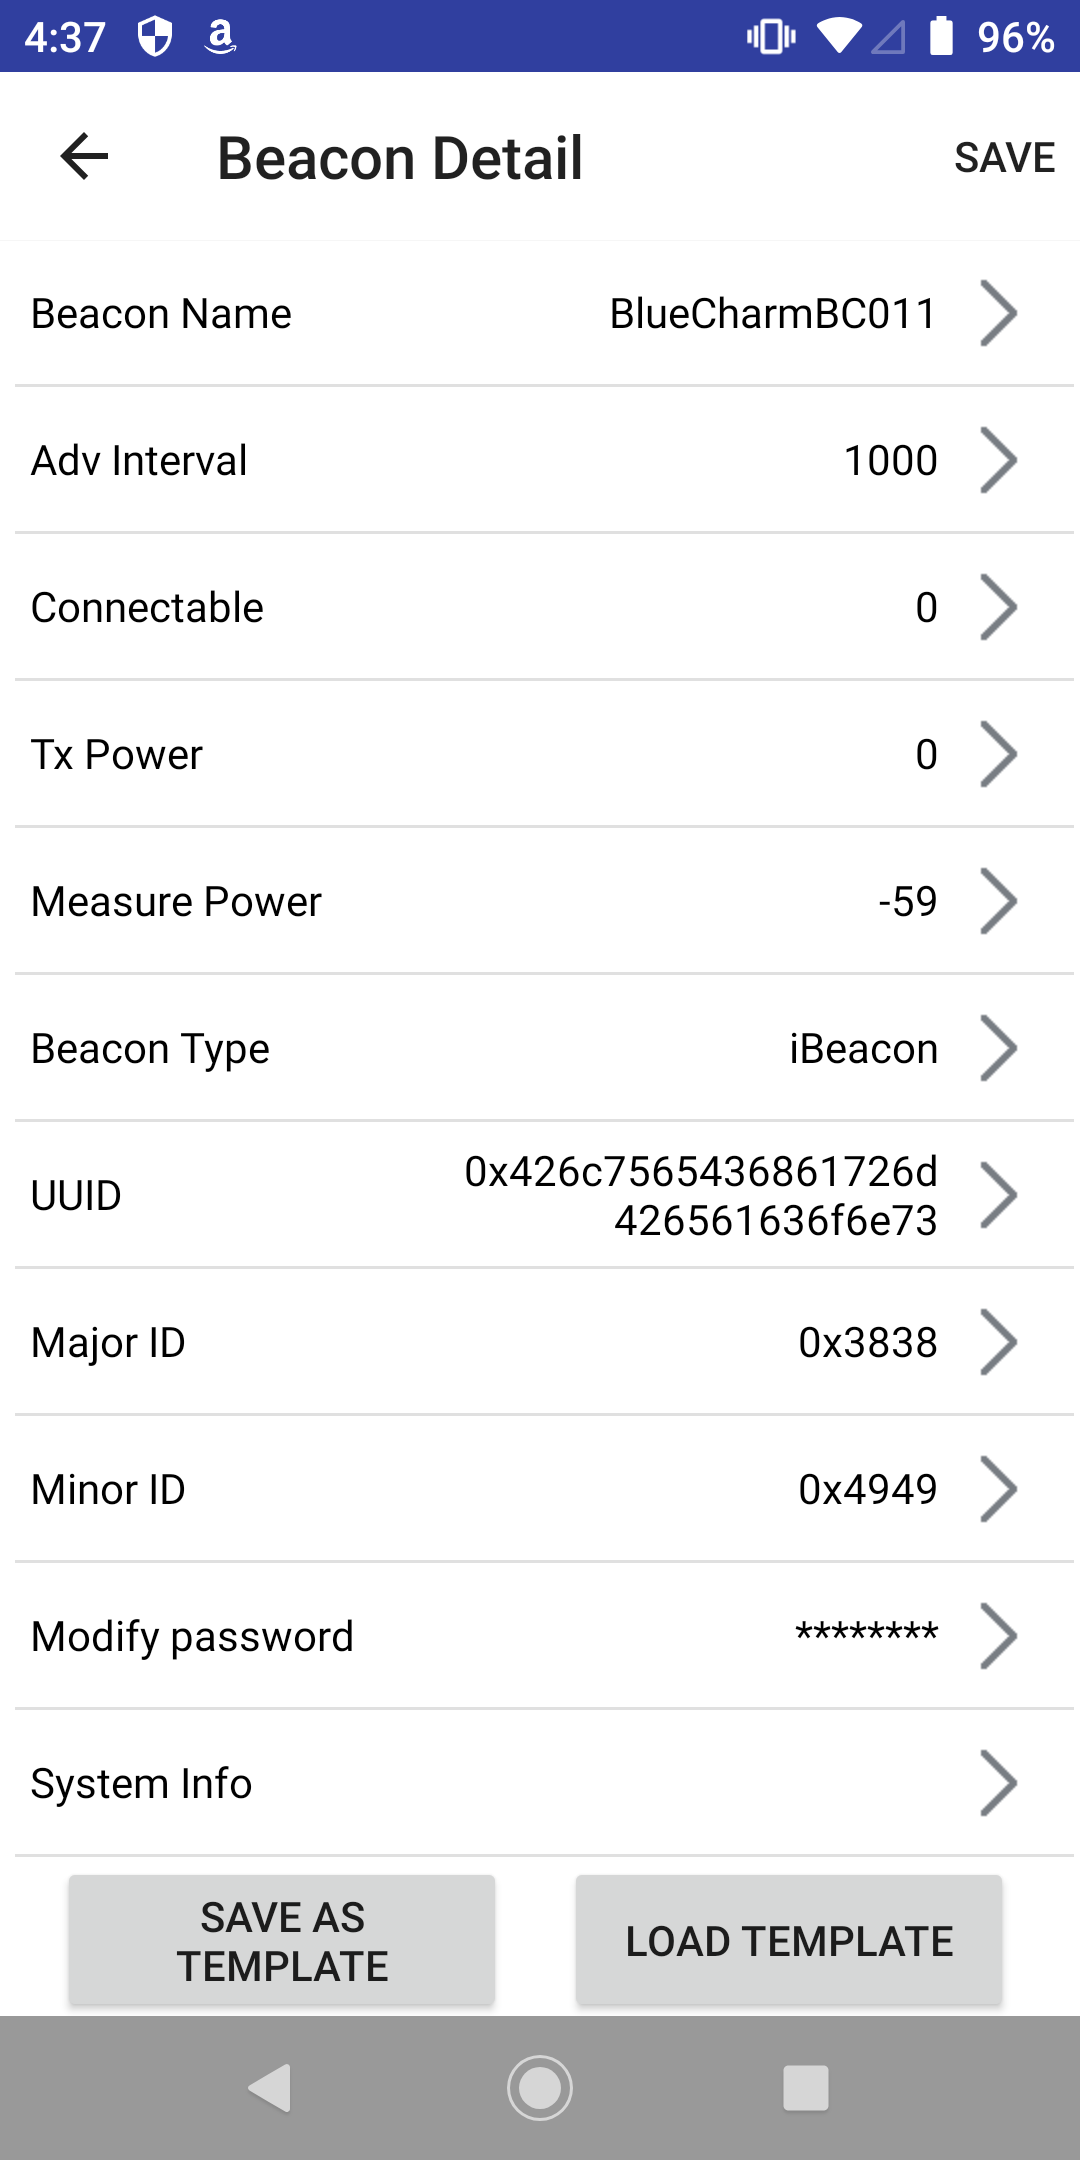
Next, let’s connect to the beacon: Go ahead and tap on your beacon name on this screen now to connect to it. Here’s what you will see once the connection is established. The app has now downloaded the beacon’s current configuration and is displaying it on the screen:


As mentioned before, the beacon already has default configuration settings, so you really don’t need to change any of these unless you have some specific reason for needing to do so. The most obvious reason would be that you have more than one beacon, so you will need each beacon to have a unique UUID/Major/Minor. If that is the case, the easiest solution is to just change the Minor ID number from 4949 to 4950 for your second beacon, then use 4951 for your third beacon, etc. That one small ID difference makes the beacons completely unique from each other. Ok, now back to our configuration process…
Now, let’s tap on the first item on the Beacon Detail page to see the System Info. Here’s what you will find there:


The System Info page shows…
Defaults:
-the system ID which is the unique MAC address of each beacon; this same number is also on a sticker on the back of each beacon.
-the beacon’s model number BC-U1 (the image above shows BC011 which is another beacon, but yours will show as BC-U1)
-the beacon’s firmware version
Changeable?:
-None of these fields are changeable by the user; they are permanently encoded into the beacon.
Next, tap on the “back arrow” on the top left of the screen to go back to the Beacon Detail main page. On that page, let’s tap on the next item on the list, Beacon Name. Here’s what you will see on the Beacon Name page:


The Beacon Name page shows…
Default name: BlueCharm_(random number)
Changeable: you can input any name of 16 ASCII characters or less.
Once you have entered a new name, tap on SAVE in the upper right corner. you will then be automatically taken back to the main Beacon Detail page.
Keep in mind that your new beacon name is now “saved” in the app temporarily. It will not be uploaded to the beacon until you tap UPLOAD on the main Beacon Detail page. Why not? Because this allows you to make multiple changes to the beacon configuration without uploading them one by one to the beacon; that would waste a lot of your time. Instead, you make your changes on the various setting pages (e.g. beacon name, interval, TX power, etc.), temporarily save them in the app, then when you are done making all your changes, you tap SAVE on the Beacon Detail page to upload them to your beacon all at once.
If that’s all you wanted to change, you could tap SAVE on the Beacon Detail page, and your new beacon name will then be uploaded to the beacon. But let’s imagine, for the sake of learning, you want to change some of the other settings as well. Since you are now back on the Beacon Detail page, let’s tap on the next setting, Adv Interval (a.k.a. Advertising Interval or Broadcast Interval). Here’s what you will see next:


The Advertising Interval page shows…
Default: 100
Changeable: Any one-decimal number between 100-10000ms, e.g. 200, 301.2, 546.5, 1285, 3000, etc. (1000 milliseconds equals 1 second).
You should also keep in mind that setting the interval to a very long period will make it very difficult for your smartphone (or other scanner device) to “see” the broadcast from the beacon. Why? Smartphones, and other scanners, are not scanning 100% of the time; this would use too much of the phone’s battery. Instead, they scan for a short period of time called the “scanning window”. The specific scanning window used depends on the app, the type of phone, whether the app is in the foreground or background, etc. But you can easily imagine that if the phone is scanning for one second every three seconds (just example numbers), it could easily and repeatedly miss the beacon broadcast if the beacon was only broadcasting once every 10 seconds. Moral of the Story: Set your beacon advertising interval to 100ms to make the broadcast more easily scanned by your smartphone.
One of the nice features of this BC-U1 beacon is that you can input very precise intervals. Check out the knowledge box below:
When beacons are being scanned by smartphones, there is the possibility that the scanning window of the phone and the broadcast of the beacon will not line up exactly. In that case, the broadcast will be missed by the phone. To reduce the chance of this happening, the smart people at Apple recommend that you set your advertising interval to one of these odd-looking numbers: 152.5 ms, 211.25 ms, 318.75 ms, 417.5 ms, 546.25 ms, 760 ms, 852.5 ms, 1022.5 ms, or 1285 ms. It is a bit complicated to explain this in detail, but suffice it to say, these intervals work better. This BC-U1 beacon has been designed with this in mind, and as far as I know, it is one of the only beacons on the market that allow the user to input these precise optimal interval numbers.
OK, so now you may have changed the advertising interval, you would then click on SAVE in the upper right hand corner and be taken back to the main Beacon Detail page. Otherwise, you don’t need to make any changes, and you could just tap on the “back” arrow in the upper left hand corner. Once you are back on the Beacon Detail page, you might tap on the next item on the list: Adv Flags, a.k.a. Advertising Flags. Here’s what you would see on that page:


The Advertising Flags page shows…
Default: Connectable is checked; Power On Always is unchecked.
“Power On Always” is not applicable on this beacon since it is USB powered, not battery powered.
Changeable: check or uncheck either one according to your preference. We recommend that you do NOT adjust these settings
Connectable checked means that the beacon will always be connectable as long as it is powered on. If you uncheck this box, then the beacon will only be connectable for 30 seconds after the button is powered on. During this period, you can connect to the beacon.
(Once you have changed the configuration of the beacon to “unconnectable”, in order to connect to it again, you need to first unplug the beacon from the power source then replug it to make it connectable. It will be connectable for 30 seconds, then revert to unconnectable. Note: if you are powering the beacon with a USB wall charger, you need to actually unplug the beacon from the wall charger, not simply unplug the wall charger from the wall outlet.)
We recommend leaving the default setting of connectable checked. It makes it easier to work with your beacon settings whenever you need to. Unchecking the box makes the beacon more secure in that somebody would need to physically access the beacon to click the button to make it connectable.
“Power On Always” is not applicable on this beacon since it is USB powered instead of battery powered.
Next, let’s go back to the main Beacon Detail page and select the TX Power setting. Here’s what you will see then:


The TX Power page shows…
Default: 0 dBm
Changeable: -40dBm, -20dBm, -16dBm, -12dBm, -8dBm, -4dBm, 0dBm, or +4dBm.
On the TX Power setting page, you are selecting the power at which the beacon will broadcast. High power (+4dBm) will make the signal reach further away. How far? If the scanning device uses Bluetooth 5.0, then the maximum range at +4dBm is about 90 meters (about 98 yards, so just 2 yards short of a touchdown). If the scanning device uses Bluetooth 4.0, then the maximum range at +4dBm will be about 50 meters. Keep in mind that these are “open air, line of sight” figures. Any obstacles, walls, glass, furniture, humans, etc. will shorten these distances.
Many users want to program a home automation device, Arduino, or Rasberry Pi to react to the presence of a beacon. Sometimes they want this reaction to only occur when the beacon is very close. With this goal in mind, they set the TX power to its lowest setting, so that the scanning device only “sees” the beacon when the beacon is very close. OK, fine, that works in some cases. But often this results in unstable behavior. A better approach is to set the TX power at one or two levels higher than the minimum needed. This ensures that the beacon is clearly “seen” by the scanner (and doesn’t pop in and out of range frequently). Then the scanner should be programmed to check the RSSI signal strength of the target beacon to determine its proximity. With this method, your program can take a running average of the RSSI figures (or use some other simple mathematical smoothing approach) in order to avoid unpredictable behavior due to the unstable nature of BLE signals.
Next, let’s return to the Beacon Detail screen and then tap on the Measured Power setting. Here’s what you will see there:


The Measured Power page shows…
Default: -59 dBm
Changeable: any number between -80~0 dBm; typical range is -69~-49 dBm. BUT it is not recommended that you adjust this setting away from the -59 default value.
The Measured Power setting is determined by the factory for each beacon during the system design phase. In effect, the -59 setting of the BC-U1 beacon indicates that if you hold your smartphone 1 meter away from the beacon, your smartphone will measure the RSSI strength of the beacon to be -59. It’s a theoretical number, influenced by environmental factors, orientation, etc. etc. caveats.
Unless you really know what you are doing, you should NOT adjust the Measured Power setting.
Next, let’s jump back to the Beacon Detail page and select the Beacon Type setting. Here’s what you will see:


The Beacon type page shows…
Default: iBeacon is checked, others are unchecked.
Changeable: You can check or uncheck any broadcasts you prefer (KSensor is not compatible with the BC-U1 beacon).
Note: Activating more than one type of broadcast at the same time will have a somewhat negative effect on the reliability of your signal. (see examples below)
But first, a short description of these different broadcast protocols:
The BC-U1’s core broadcast (not listed on the Beacon Type page) includes the unchangeable unique MAC number of the beacon and the battery level in percent terms , e.g. “Battery: 100%”. The core broadcast is always enabled.
iBeacon format is the most common broadcast format. It broadcasts an unique identifier number made up of the UUID, the Major value, and the Minor value.
Eddystone TLM format broadcasts the battery level of the beacon (3000mV = 3 volts, i.e. fully charged; the BC-U1 beacon has not battery, so it will always show as 100%), the celcius temperature around the beacon, the number of advertisements that have been sent out in the life of the beacon, and the amount of time that the beacon has been broadcasting.
Note that the temperature sensor in the BC-U1 is only accurate to +/-2 degrees C due to the chip being enclosed inside the housing. For this same reason, it does not react to temperature change very quickly. In other words, this temperature reading should only be used as a rough general indicator.
Eddystone URL format broadcasts a website URL address. For example, https://www.bluecharmbeacons.com.
Several years ago, the Eddystone URL broadcast was popularized by Google/Android as a way of advertising your website to strangers passing by, BUT this function was discontinued by Google in December 2018. As a result, this protocol lost some of its attractiveness. There are still some specific usage cases though where it is still quite suitable. For example, you can make a simple “self-guided tour” by setting each beacon to broadcast a different informational webpage URL, then have visitors use one of the free “Physical Web” apps to automatically view the appropriate info webpage when the visitor approaches a certain location/beacon.
Eddystone UID format broadcasts a unique ID number made up of a Namespace ID and an Instance ID. This protocol can be managed via Google’s Beacon Dashboard and is quite effective for some technical usage cases. Warning: Google’s Beacon Dashboard and other technical requirements are not recommended for the non-tech-savvy. In fact, it is very very confusing.
KSensor format broadcasts telemetry information from a motion-sensing chip inside the beacon. The BC-U1 beacon does not have a motion sensing chip, so this broadcast format is not used with this beacon.
Multiple broadcasts: The BC-U1 is called a “multi beacon” because it can broadcast one or more formats at the same time. This gets a little tricky, so let’s look at some examples first:
Example 1: iBeacon and TLM broadcasts checked, 1000ms interval setting
By definition with this beacon, if TLM is enabled as it is in this example, the TLM broadcast goes out once every tenth broadcast by default. (You can adjust this using the TLM Interval menu; see below for more details.)
after 1000ms, iBeacon broadcast
after 1000ms, iBeacon broadcast
after 1000ms, iBeacon broadcast
after 1000ms, iBeacon broadcast
after 1000ms, iBeacon broadcast
after 1000ms, iBeacon broadcast
after 1000ms, iBeacon broadcast
after 1000ms, iBeacon broadcast
after 1000ms, iBeacon broadcast
after 1000ms, TLM broadcast
after 1000ms, iBeacon broadcast
after 1000ms, iBeacon broadcast
after 1000ms, iBeacon broadcast
…etc.
So you would have 9 iBeacon broadcasts, once per second, then one TLM broadcast, then back to 9 iBeacon broadcasts, etc.
Example 2: iBeacon, URL, and TLM broadcasts all checked, 1000ms interval setting:
after 1000ms, iBeacon broadcast
after 1000ms, URL broadcast
after 1000ms, iBeacon broadcast
after 1000ms, URL broadcast
after 1000ms, iBeacon broadcast
after 1000ms, URL broadcast
after 1000ms, iBeacon broadcast
after 1000ms, URL broadcast
after 1000ms, iBeacon broadcast
after 1000ms, TLM broadcast
after 1000ms, iBeacon broadcast
after 1000ms, URL broadcast
after 1000ms, iBeacon broadcast
…etc.
Although the beacon’s interval was set at 1000ms, under this scenario, the effective iBeacon interval is now actually 2000ms, right?
Example 3: iBeacon, URL, UID, and TLM broadcasts all checked, 1000ms interval setting:
after 1000ms, iBeacon broadcast
after 1000ms, URL broadcast
after 1000ms, UID broadcast
after 1000ms, iBeacon broadcast
after 1000ms, URL broadcast
after 1000ms, UID broadcast
after 1000ms, iBeacon broadcast
after 1000ms, URL broadcast
after 1000ms, UID broadcast
after 1000ms, TLM broadcast
after 1000ms, iBeacon broadcast
after 1000ms, URL broadcast
after 1000ms, UID broadcast
…etc.
Although the beacon’s interval was set at 1000ms, under this scenario, you could say that the iBeacon average interval is now actually 3333ms, right?
By effectively lengthening the interval of the iBeacon broadcast, you make the signal more difficult for the scanner to catch. That’s why it is not recommended to have multiple broadcasts at the same time (with the exception of TLM which you can adjust how often it replaces the main broadcast). Of course, in some specific cases, that might be exactly what you need, so that’s fine.
Now that you have enabled iBeacon format, when you jump back to the Beacon Detail page, you will see a menu selection for setting the iBeacon UUID. Tap on it, and you will see this:


The iBeacon UUID page shows…
Default: 426C7565-4368-6172-6D42-6561636F6E73
Changeable: Any proper length and formatted UUID where each digit is hex. i.e. has a Value of 0 to 9 or A to F. Note that with this app, you need to enter dashes in the correct spots.
Note: The app offers you some alternative UUIDS to select to be compatible with services like Air Locate, Web Chat, etc. You can choose one of these or just use the default UUID or make up one of your own.
Jump back to the Beacon Detail page, tap on iBeacon Major, and you will see this page:


The iBeacon Major page shows…
Default: 3838
Changeable: Any number from 0-65535, e.g. 58 or 229 or 5791 or 59985
Jump back to the Beacon Detail page, tap on iBeacon Minor, and you will see this page:


The iBeacon Minor page shows…
Default: 4949
Changeable: Any number from 0-65535, e.g. 58 or 229 or 5791 or 59985
Now you have completely configured the settings for the iBeacon broadcast format, i.e. UUID, Major, and Minor. Jump back to the Beacon Detail page now.
You might expect to see some selections for the TLM broadcast settings, but there are not any there because there is nothing to select with TLM. It just does what it is supposed to do without any special settings to be chosen.
You might also be wondering where the Eddystone URL and UID settings menus are located. They will appear on the Beacon Detail page but only when/if you enable those broadcasts.
Jump back to the Beacon Detail page and select the next item on the list: TLM Interval.
-

iPhone version -

Android version


The TLM Interval page shows…
Default: 10
Changeable: Any number from 2-100, e.g. 10 or 18 or 27 or 100.
The default value of 10 means that the regular broadcast will be replacement every 10th broadcast by the TLM broadcast. If you don’t want the TLM broadcast to replace the main broadcast that often, you can adjust this number to anything between 2-100. 2 would make TLM broadcast replace the main broadcast every 2nd broadcast; that is very frequent and not recommended unless you have some specific need to very frequent TLM readings. 100 would make it replace the main broadcast every 100th broadcast.
Jump back to the Beacon Detail page and select the next item on the list: Trigger Command.
-

iPhone version -

Android version


The Trigger List pages shows…
Oops, your screen will not show any Trigger Command menu choice since the BC-U1 does not have a button trigger.
Last but not least, jump back to the Beacon Detail page and select the Modify Password menu to see this page:
-

iPhone version -

Android version


The Modify Password page shows…
Default Password: 0000000000000000
Changeable: any password ranging from 8-16 ASCII characters
NOTE 1: It is NOT recommended for users to change the password. If you do change the password and forget what you changed it to, there is nothing we can do to help you. The beacon can not be reset to factory settings in order to get back to the default password.
NOTE 2: If you still want to change the password, please note that the password is stored in the beacon AND in the app. So when you use the app to connect to another beacon with a different password, you may initially see a “code 2” or “error 2” message. If you do experience this problem, please use the app to change the password on your second beacon to the same password as your first beacon. In other words, if all the passwords are the same, it will be much easier. That said, we still recommend that you do NOT change the password. If you are concerned about security, change the Advertising Flag setting to unconnectable.
Finally, jump back to the Beacon Detail page one last time. You have now made all of your changes and one by one pressed SAVE on those pages to temporarily store those settings in the app memory. The last step you must do now is to tap on SAVE on the Beacon Detail page in order to upload all your changes to the beacon. Try it now, and you will see:
-

iPhone version -

Android version


Yay, all your changes have been uploaded to the beacon. You can now see a Success message on your screen. Tap OK on that message to make it go away. If you are all done now, tap on the back arrow in the upper left corner to leave the Beacon Detail page and to return to the main app scan page. This will disconnect the beacon from the app. Note that the beacon will not begin broadcasting until after it has been disconnected.
Remember to tap on SCAN on the app scan page to restart the scan and/or swipe down on the app scan page screen to refresh the page and restart the scan.
Your beacon is now configured according to your wishes and is broadcasting.
Once configured, Bluetooth Low Energy (BLE) beacons operate totally independently from your phone. You can take your phone 1000 miles away from the beacon or turn your phone off; there will be no effect on the beacon. The beacon will just keep on broadcasting its broadcast. It is not like a regular Bluetooth device that needs to be connected to your phone to operate. So once it is configured to your wishes, don’t connect to it in any way anymore. Just turn the beacon on to broadcast, and turn it off to stop broadcasting.
To Turn Off The Beacon
If you wish to stop broadcasting, turn off the beacon by unplugging it from its power source.
Questions?
Note: If you have any questions about any of these instructions, please feel free to CONTACT us any time. We are here to answer your questions or help in any way (almost all emails are answered by Thomas, the owner of Blue Charm).